How to Onboard a New SEO Client's WordPress Site (Fast)
By AutoBoost Team · 2026-06-22 · 10 min read
The first two weeks of a new SEO engagement decide the relationship.
- A client who sees clear movement and a tidy process early on stays calm for the long, slow work that follows.
- A client who hears nothing for a month starts to wonder what they are paying for.
The good news: WordPress sites almost always have a pile of fixable, visible quick wins sitting in the metadata, and you can surface them on day one.
This guide lays out a fast, repeatable onboarding for a new client's WordPress site. The plan in five moves:
- Get access safely.
- Run a baseline audit.
- Find the wins that show up early.
- Set a number you can report against.
- Fix the right things first.
Key takeaways
- Use the AutoBoost connector plugin plus an Application Password, not the client's admin login. Safer, revocable, and more professional.
- Run a baseline audit in the first 48 hours so you have a number to report progress against later.
- Missing metadata (titles, meta descriptions, focus keywords, alt text) is the fastest, most visible win, perfect for week one.
- Keep a human in the loop. Nothing publishes to a client site until you approve it.
Why the first two weeks matter so much
New clients are not judging your link-building strategy in week one. They cannot see it yet.
What they can see is whether you turned up, whether you understood their site, and whether anything started moving. That early read sets the tone for everything after.
The trap is spending the whole onboarding period on discovery calls and audit decks while the site itself stays untouched. You look busy, but the client has nothing concrete to point at.
The fix is to run discovery and ship a visible improvement in parallel. WordPress makes this easy because the most common SEO gaps, missing or weak metadata, are both quick to fix and easy to show.
If you manage SEO across a roster of clients, this also needs to be a process, not a one-off scramble. Two guides go wider:
- Managing SEO across multiple WordPress sites for the wider operating model.
- SEO for agencies on WordPress for how this fits a productised service.
Step 1: Get access the safe way
The instinct is to ask for the admin username and password. Do not. Sharing a full admin login is bad for both sides:
- The client hands over total control of their site.
- You become liable for everything on it.
- When the engagement ends, nobody remembers to rotate the credential.
It is also a red flag to a switched-on client that you do not work cleanly.
The professional approach on WordPress is an Application Password. It is a built-in WordPress feature (Users, then Profile, then Application Passwords) that issues a scoped, revocable credential for a specific tool.
Why it wins:
- The client keeps their own login. You never see or store their real password.
- They stay in control. They can revoke your access in two clicks the day you finish.
AutoBoost connects to the site through its connector plugin plus one of these Application Passwords. The handshake is three steps:
- The client installs the small connector plugin.
- The client generates an Application Password.
- The client pastes the connection details into AutoBoost.
Tip: Write the access request as a short, copy-paste-ready set of steps with screenshots. A client who can grant access in five minutes without a phone call is a client who already trusts your process. Build this once and reuse it for every onboarding.
A quick onboarding access checklist:
- Client installs the AutoBoost connector plugin
- Client generates a named Application Password (call it "AutoBoost" so it is obvious in their list)
- You connect the site in AutoBoost and confirm the scan starts
- You confirm which SEO plugin the site runs (RankMath, Yoast or AIOSEO)
- You note the post and page count so the audit scope is clear
That last point matters for pricing.
- A small business site might have a few hundred URLs.
- A publisher could have tens of thousands.
AutoBoost tiers are by post limit, and agencies typically work on the Agency or Enterprise plans. Knowing the count up front means no surprises mid-engagement.
Step 2: Run the baseline audit
Once the site is connected, AutoBoost scans every post and page and flags what is missing:
- Posts with no focus keyword.
- Posts with no SEO title.
- Posts with no meta description.
- Thin or duplicate metadata.
This is your baseline, and you should capture it within the first 48 hours.
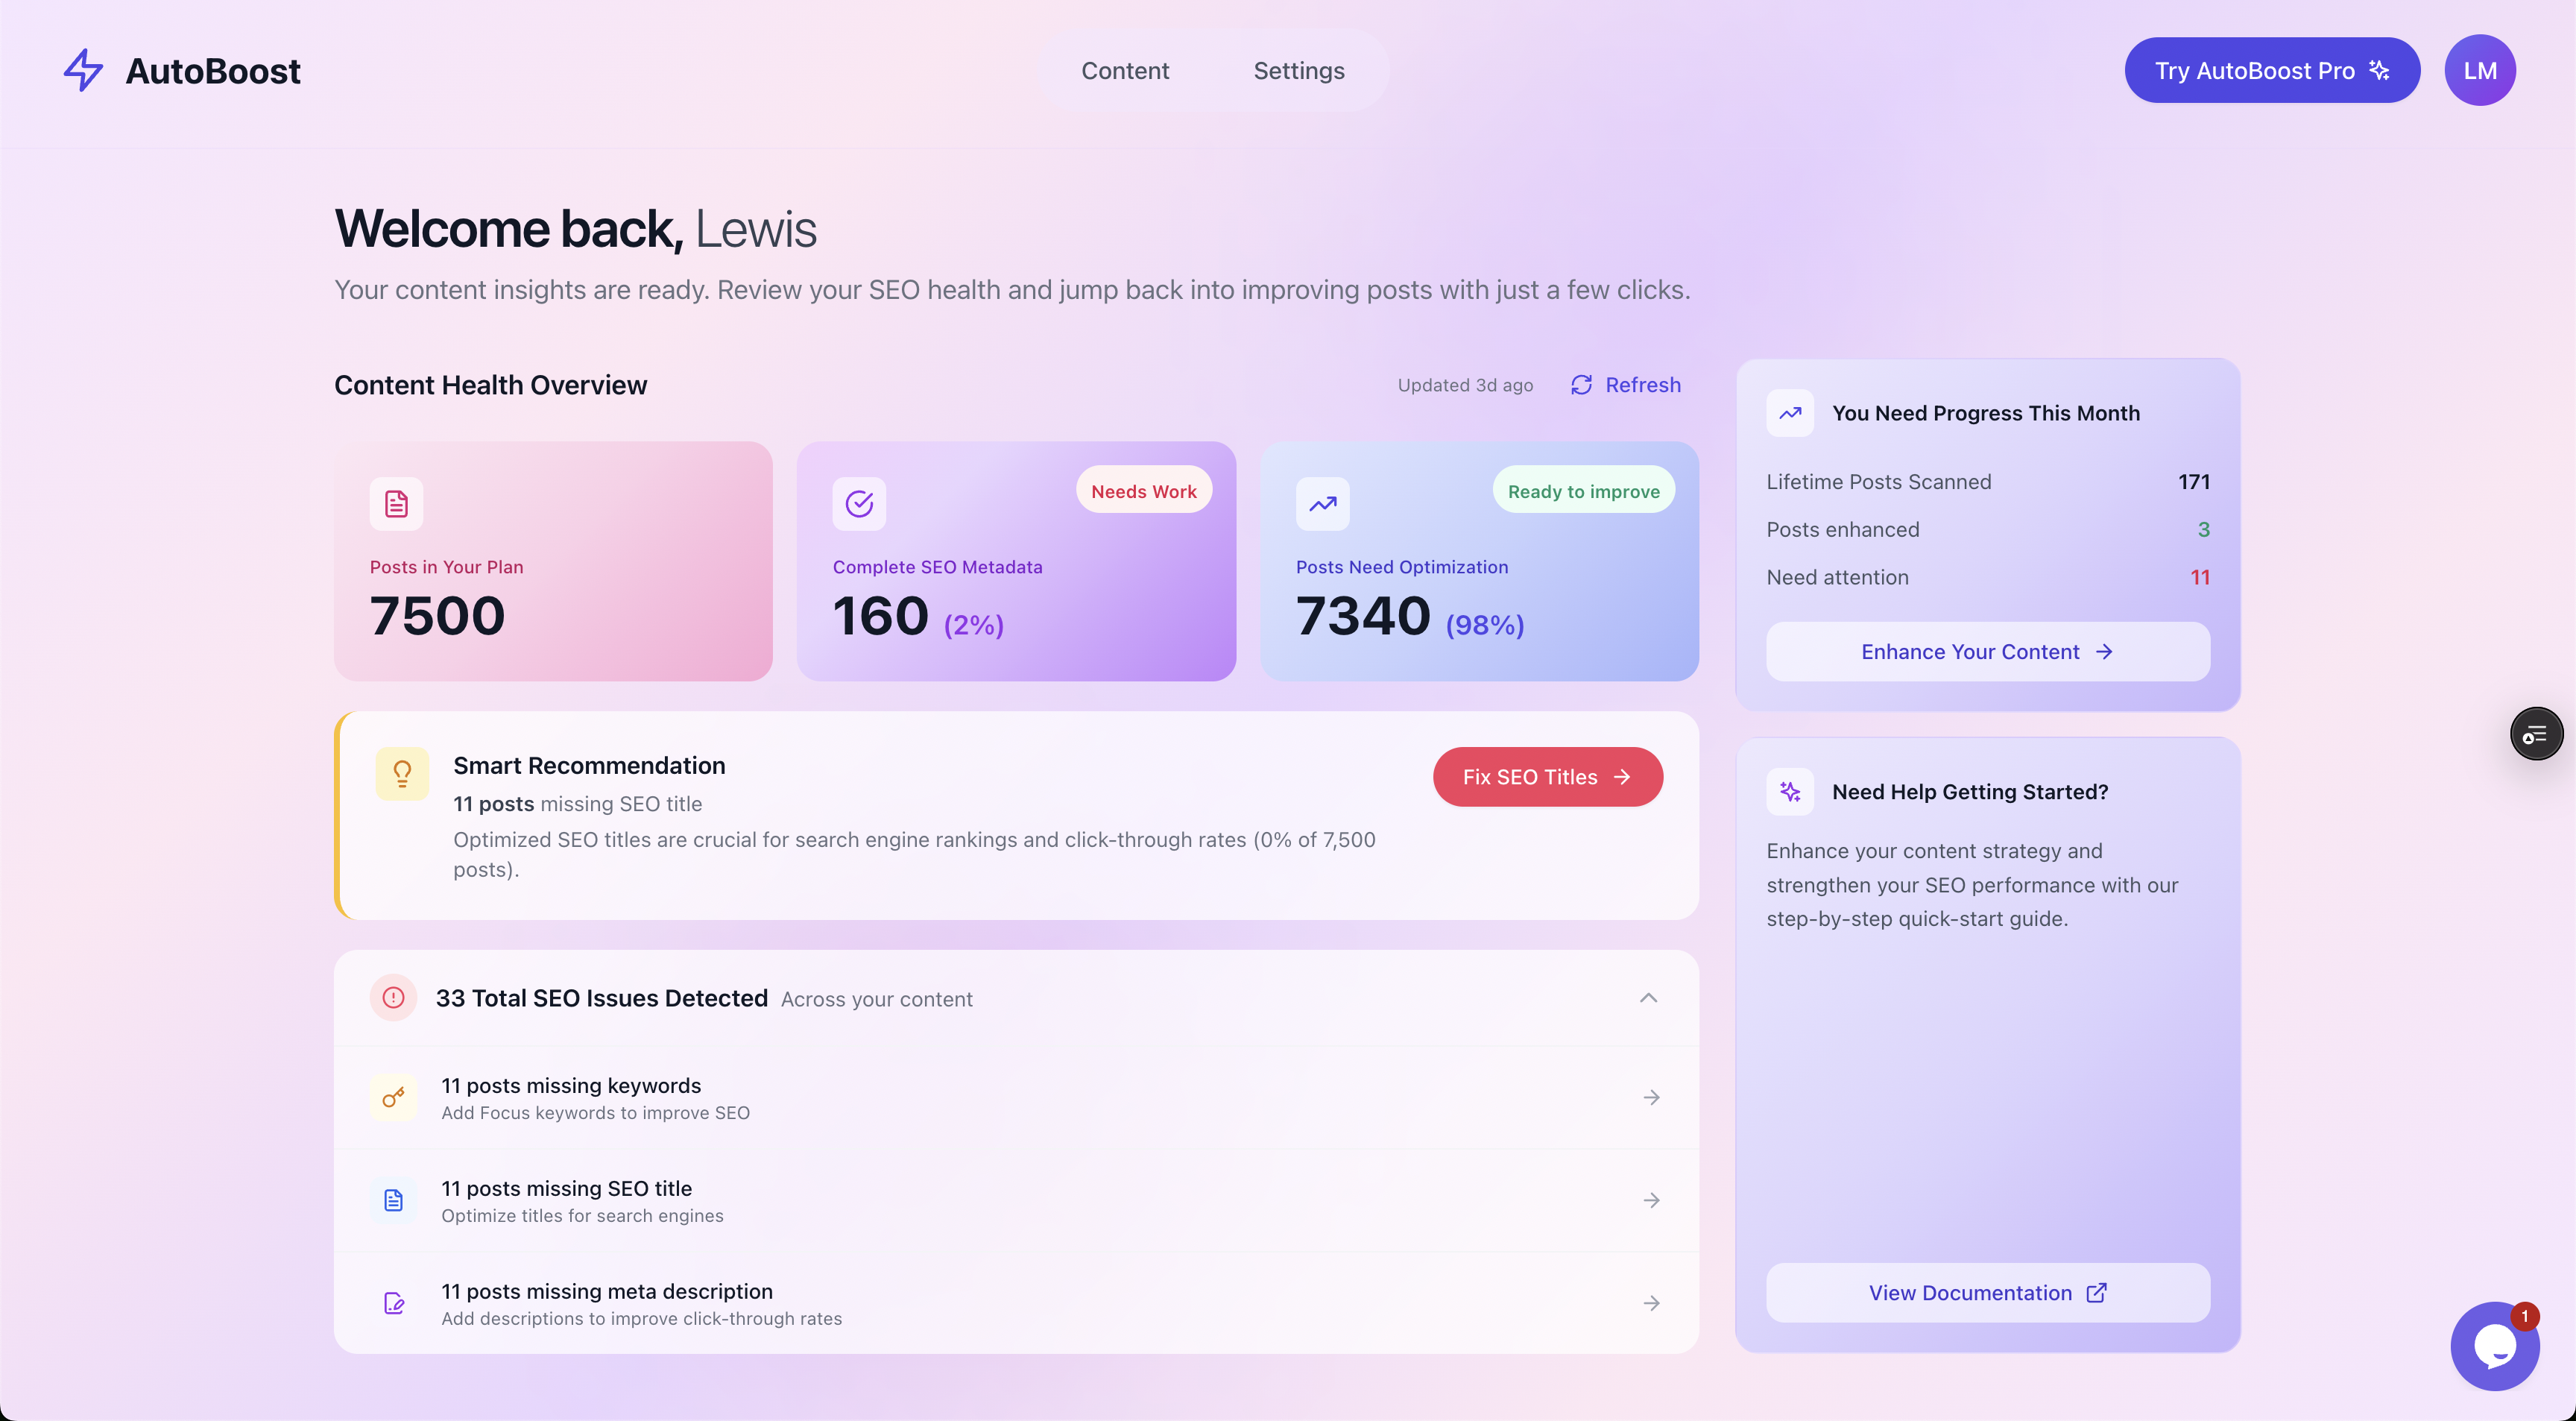
The Content Health Overview gives you a single baseline number to report against. Screenshot it on day one.
The headline figure on the dashboard, the share of content that needs optimisation, is the single most useful number in the whole onboarding.
Do three things with it:
- Screenshot it.
- Date it.
- Reference it. This is the "before" you will cite in every progress report for the next three months.
When you halve that number, you have a concrete result the client understands without any SEO vocabulary.
AutoBoost reads the existing data from the site's own SEO plugin, so the audit reflects what is genuinely live, not a separate parallel system. It works with RankMath, Yoast and AIOSEO rather than replacing them.
For a deeper treatment of how to read these gaps, see how to run a WordPress SEO audit for missing fields.
Step 3: Find the quick wins
Now filter the audit down to what you can fix fast. The content management view lets you slice by exactly the gaps that produce visible early progress:
- Missing title
- Missing SEO title
- Missing keywords
- Missing meta
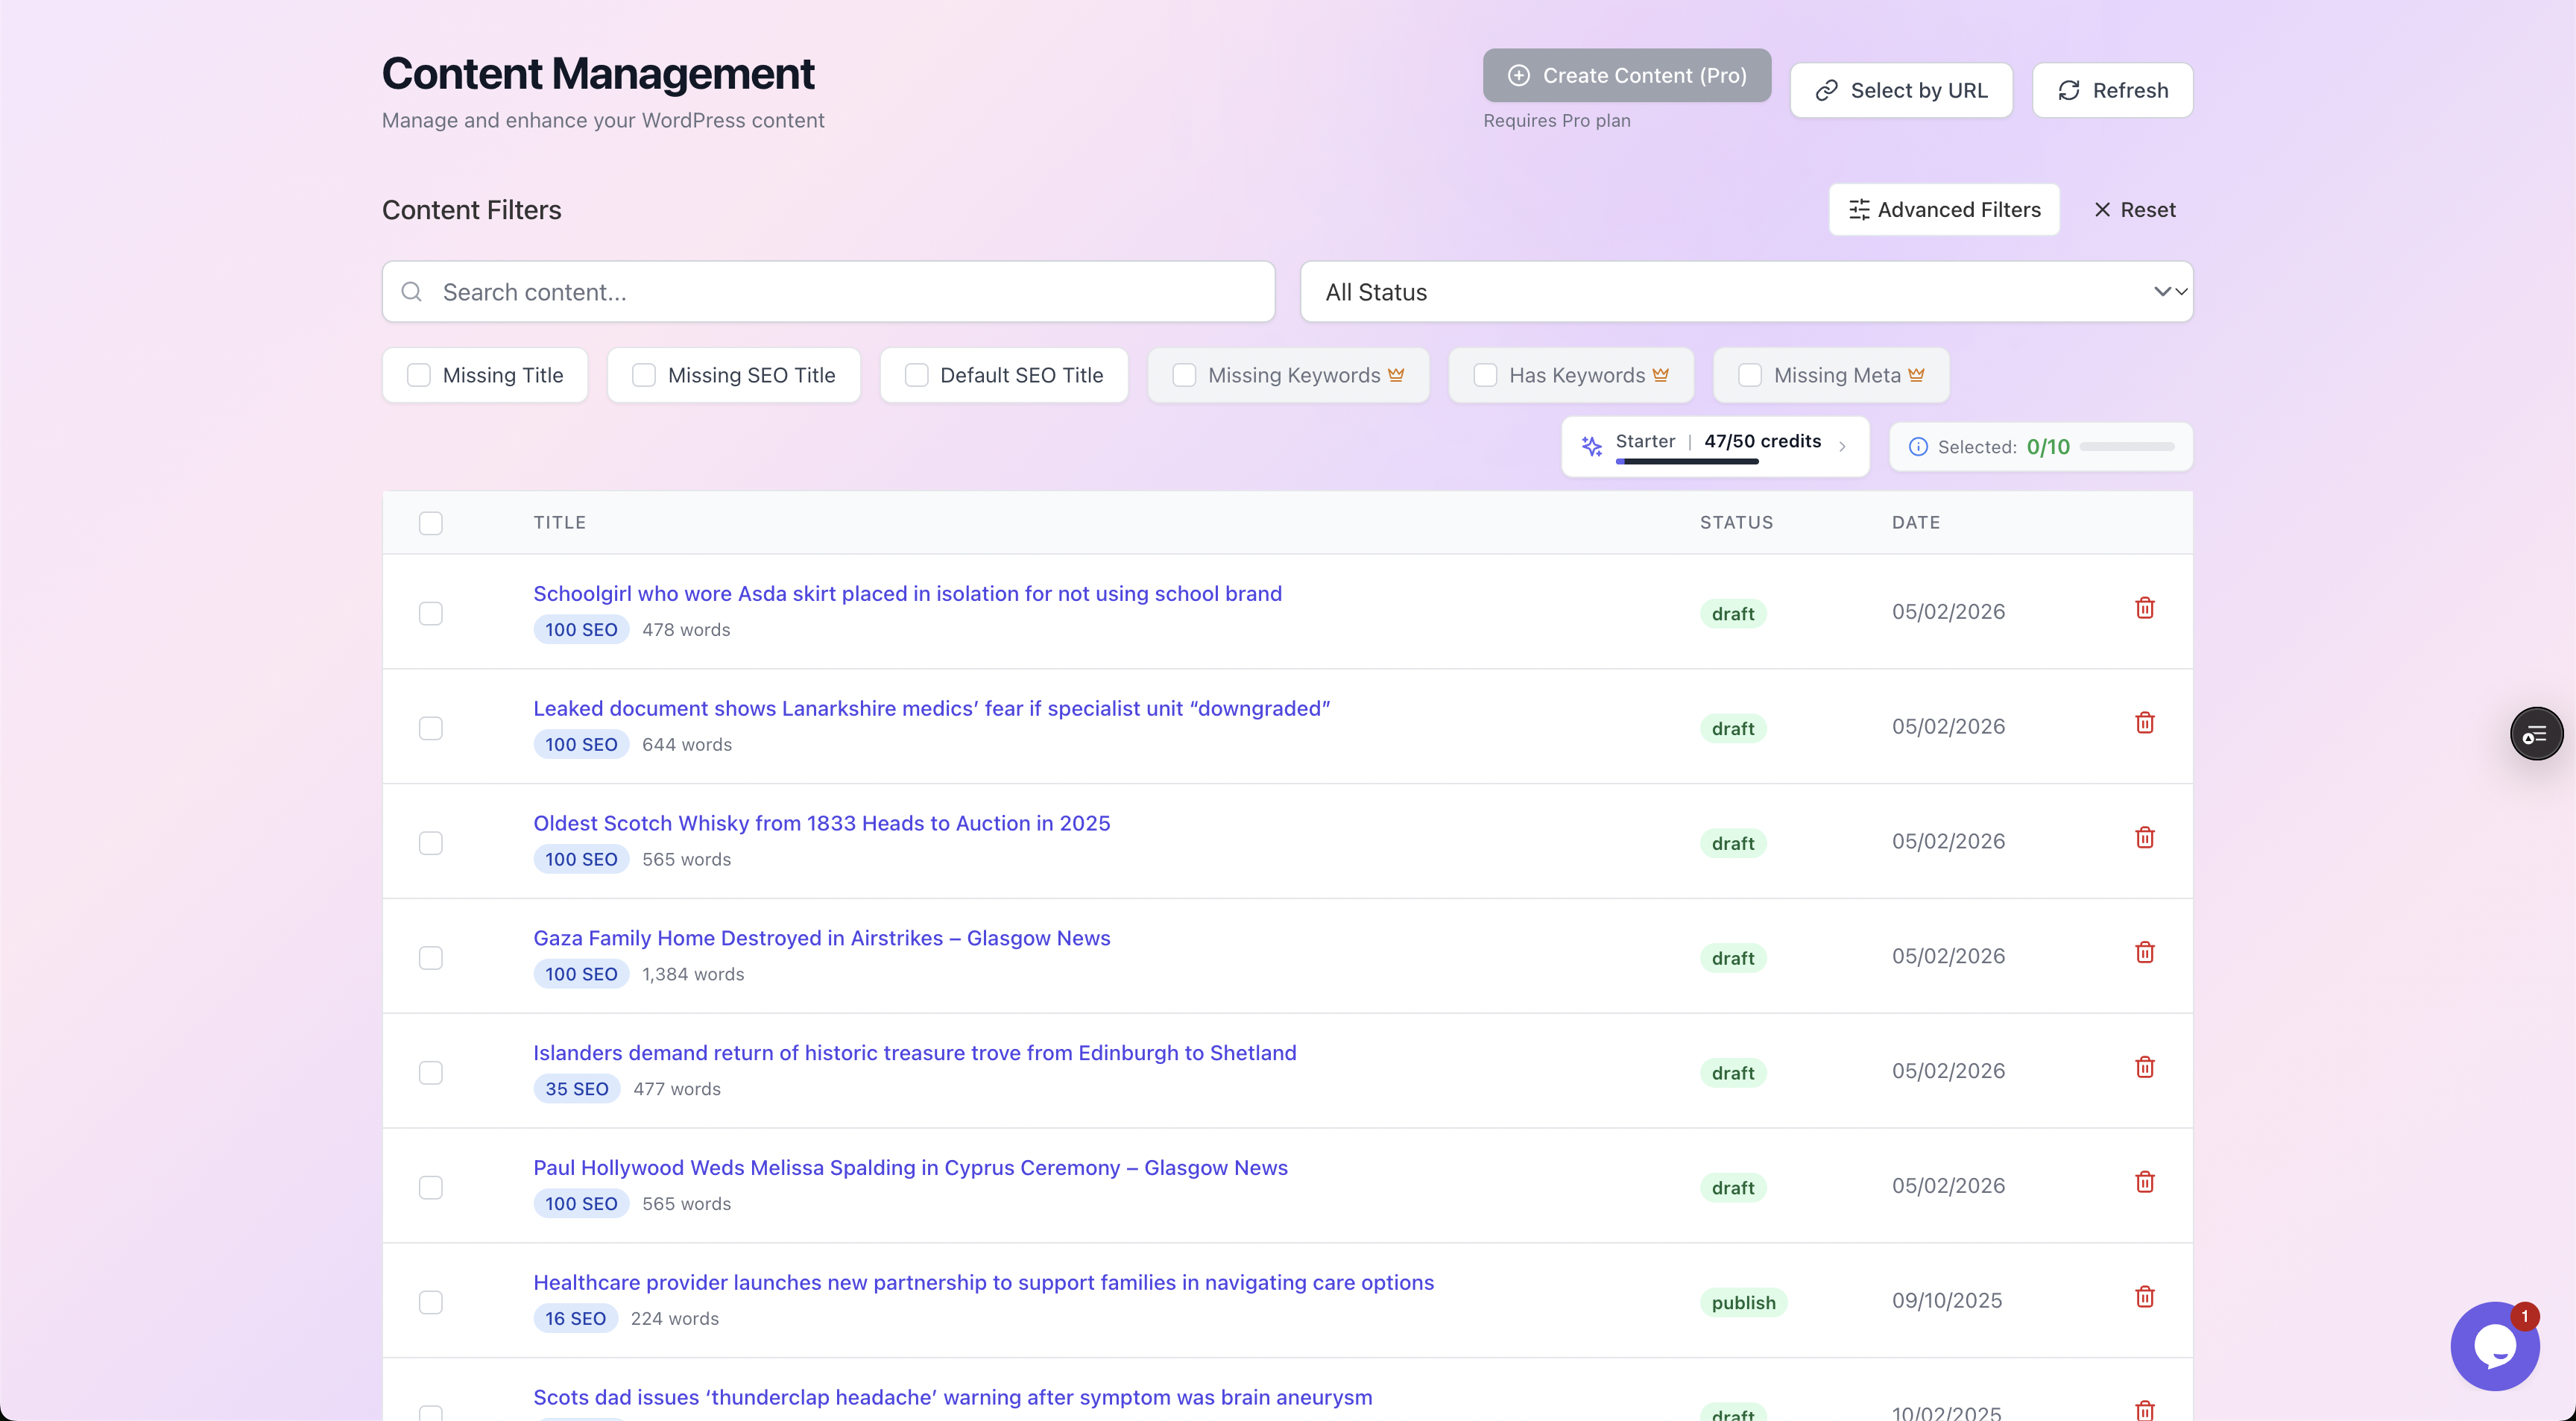
Filter chips isolate the fast wins. Start with the pages that already get traffic.
Not every gap is equal. A 2018 blog post with no traffic and no meta description is a fix, but it is not a priority.
Sort or cross-reference against the client's top pages (use Search Console or analytics) and start where attention already exists:
- The homepage.
- Key service or product pages.
- The handful of posts that pull the most organic traffic.
Fixing the metadata on a page that already ranks on page two can move the needle on clicks far faster than touching a hundred dead URLs.
Here is how to split the work so the client sees momentum without you overpromising:
| Week 1 quick wins (visible, low risk) | Longer-term work (slow, strategic) |
|---|---|
| Fill missing meta descriptions on top pages | Content gap analysis and new article briefs |
| Fix missing or duplicate SEO titles | Internal linking architecture overhaul |
| Add focus keywords to high-traffic posts | Earning backlinks and digital PR |
| Add image alt text in bulk | Rewriting thin or outdated content |
| Generate missing schema markup | Technical fixes (speed, crawl budget, redirects) |
| Set the reporting baseline | Tracking rankings and traffic trends over time |
The left column is mostly repetitive metadata work, which is exactly what AutoBoost automates. It bulk-generates optimised meta descriptions, SEO titles, focus keywords, image alt text and schema, then writes them back into the site's existing SEO plugin.
The right column is judgement, relationships and strategy. That is your job, and no tool does it for you.
Be honest with the client about that split. Automation clears the busywork so you have time for the work that actually compounds.
Step 4: Keep a human in the loop
This matters on your own sites and matters more on a client's. AutoBoost never publishes anything automatically. Every generated title, description or keyword is shown for review before it goes anywhere near the live site.
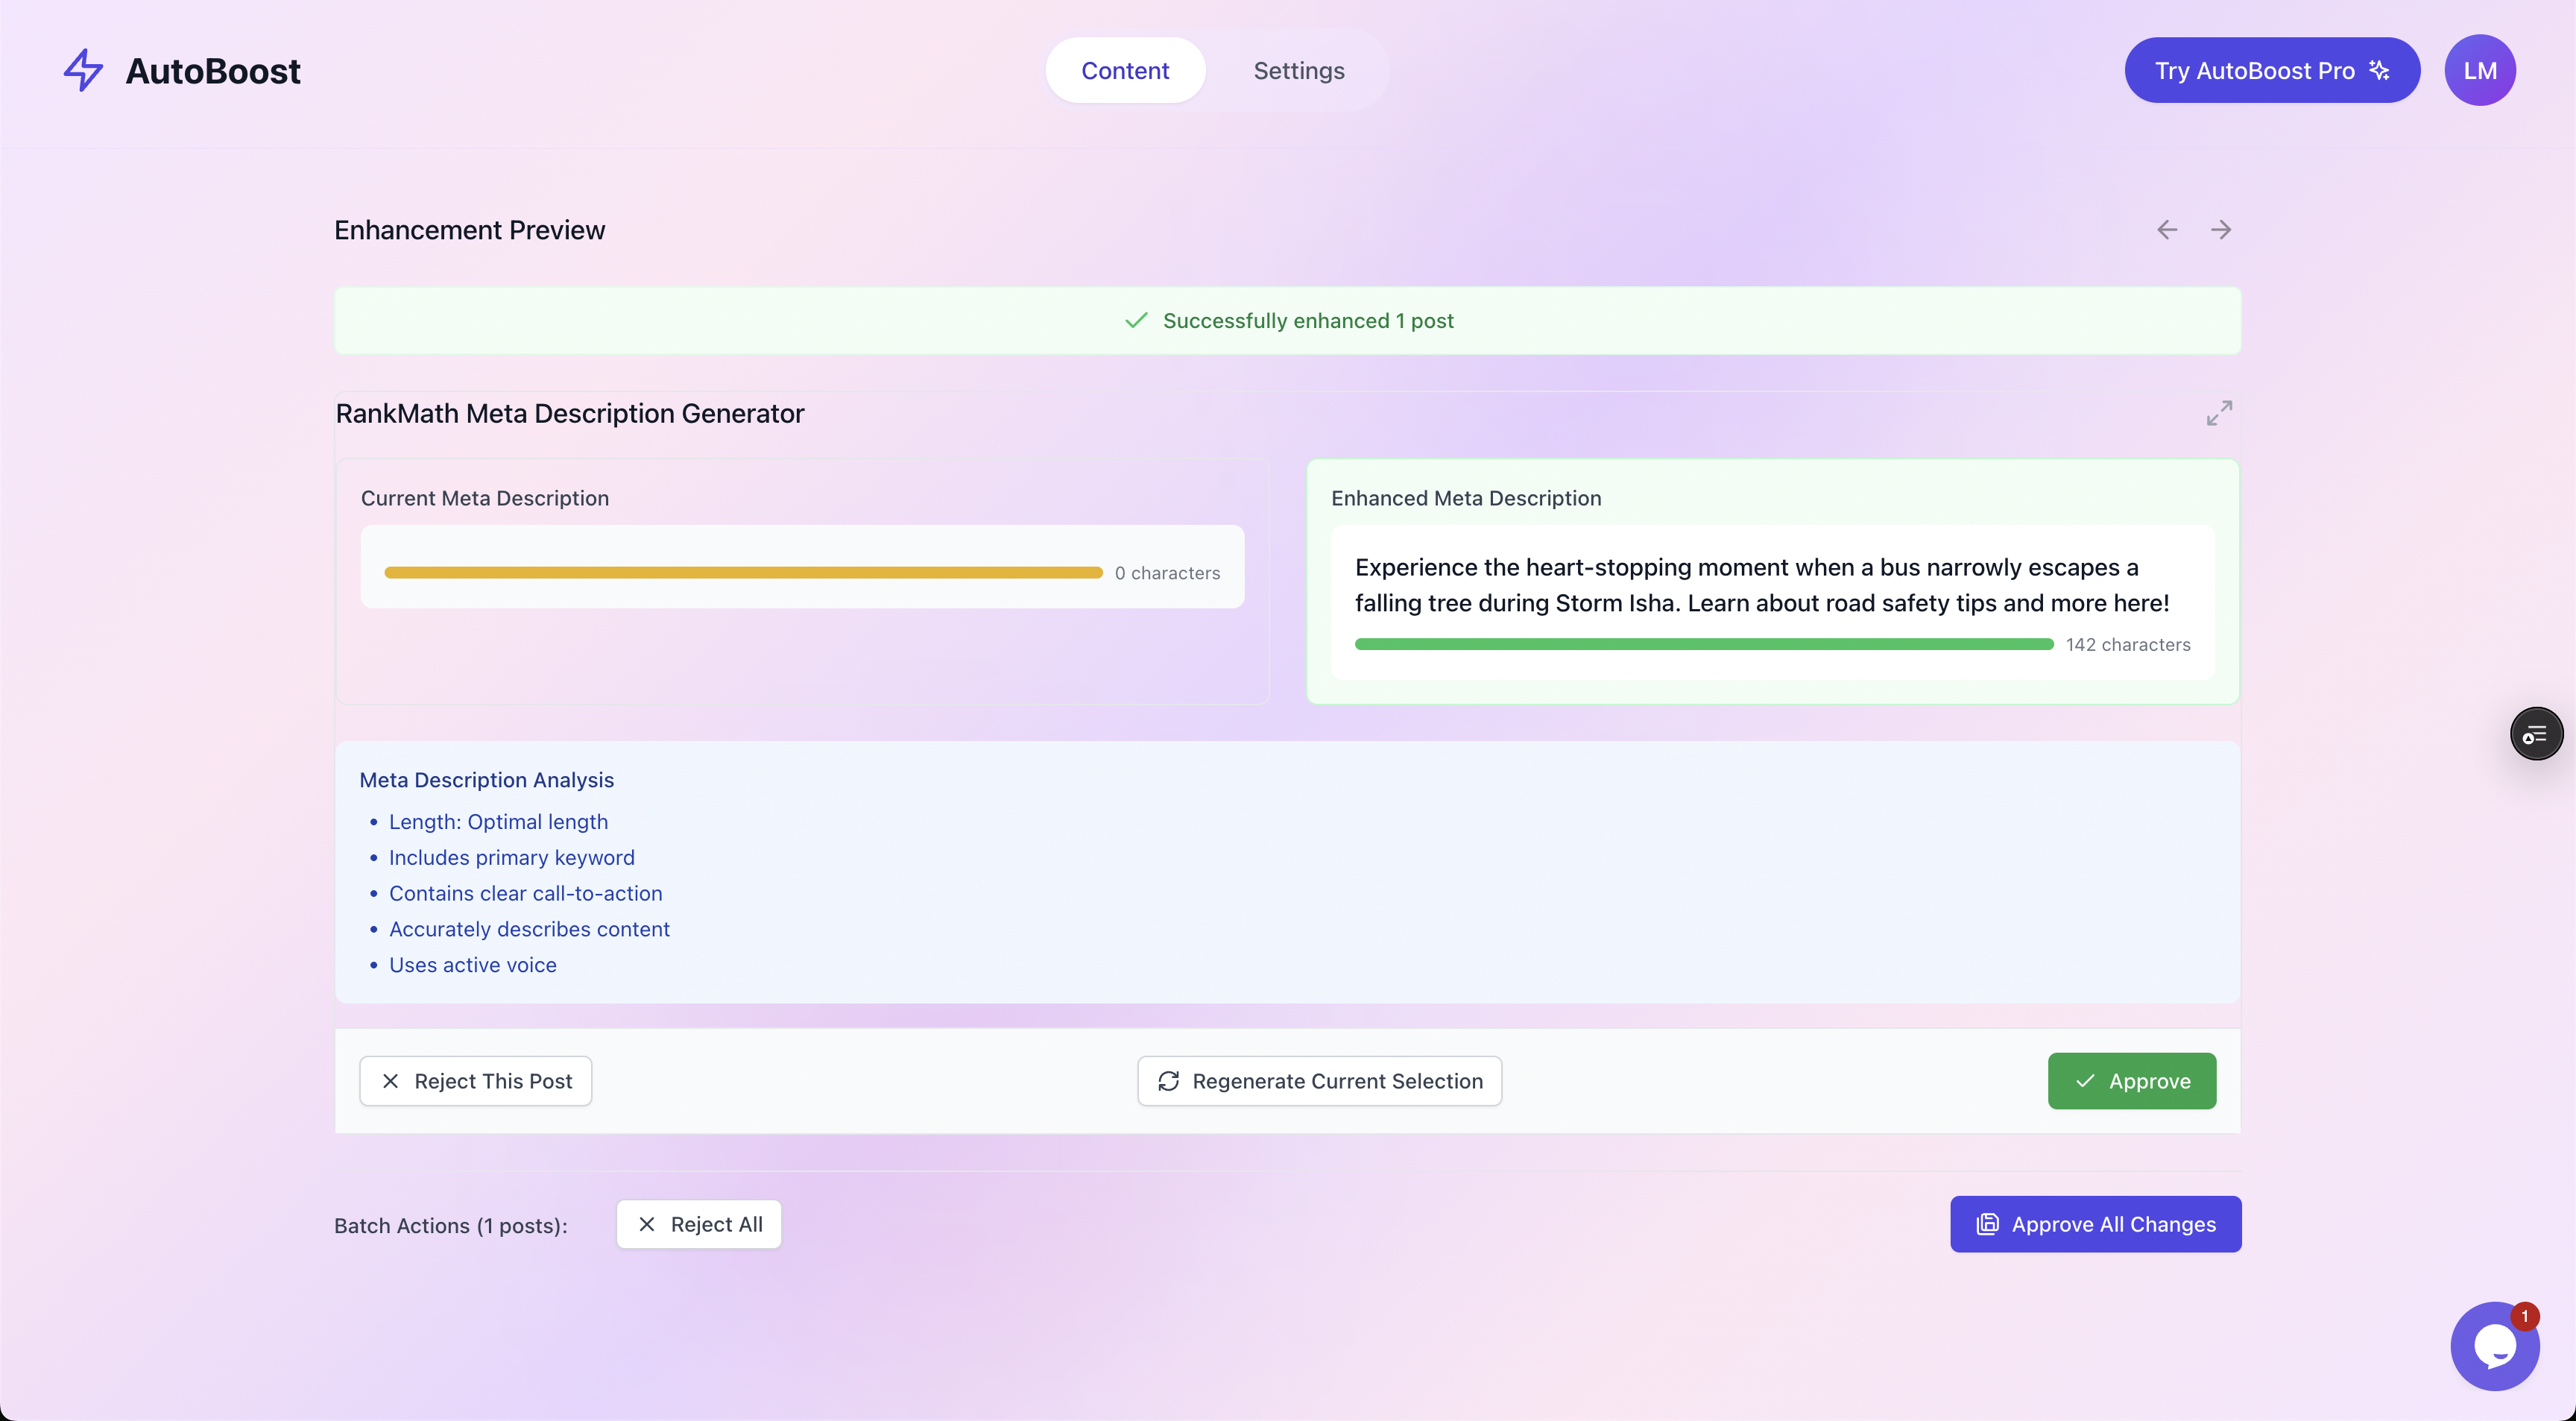
Current versus enhanced, side by side, with a quality checklist. You approve or reject before anything is written back.
You see the current value, the proposed value, and a quality checklist, then approve or reject.
On a new client site you do not yet know:
- Their tone.
- Their banned phrases.
- Their product names.
Reviewing the first batch closely teaches you all of that fast, and protects you from an embarrassing auto-published description on a client's flagship page.
Watch out: A few minutes of review in week one is cheap insurance for the relationship. Skipping it on an unfamiliar site is exactly how the wrong product name ends up live on the homepage.
A worked example: a first-week win
A new client runs a 400-post WordPress blog on Yoast. They came to you frustrated that traffic had plateaued and they "had no idea what was wrong".
Day one. You connect the site through the connector plugin and an Application Password. The scan finishes and the dashboard shows 71% of content needs optimisation, with 186 posts missing a meta description entirely. You screenshot it. That is your baseline.
Day two. You filter to "Missing Meta" and cross-reference against Search Console. Eighteen of those 186 posts already rank on page two for decent-volume queries, they just have no meta description, so Google is auto-generating a poor snippet and the click-through rate is weak.
That is your week-one target list: high intent, already visible, fast to fix.
The fix itself takes under an hour of hands-on time:
- Bulk-generate meta descriptions for those 18 posts.
- Review each one against the quality checklist.
- Tweak two that used the wrong product name.
- Approve the batch.
By Friday you send the client a two-line update:
"186 posts were missing meta descriptions. I have fixed the 18 that already rank, so Google now shows a proper, click-worthy snippet on your best pages. The rest are queued. Baseline was 71% of content needing work, here is where we will track it."
For more on this specific fix, see fixing missing meta descriptions in bulk.
That email does more for the relationship than any audit deck. It works because it is:
- Specific. It names exact numbers.
- Results-led. It shows a concrete improvement.
- Clear on expectations. It tells the client what is queued.
- Trackable. It gives the client a number to follow.
You have bought yourself the goodwill to do the slow work.
Step 5: Set up reporting from day one
The baseline you captured is only useful if you keep measuring against it.
- Agree with the client on a simple cadence. A fortnightly or monthly note works for most.
- Report against the same dashboard number every time.
"Content needing optimisation dropped from 71% to 34% this month" is a sentence any client understands, no jargon required.
Tip: Resist the urge to flood the first report with raw rankings data. Rankings are noisy and slow in the first month, and leading with them invites panic when one keyword wobbles.
Order your first report like this:
- Lead with the work you have completed.
- Lead with the metadata health number, which moves quickly and directly because of what you are doing.
- Bring rankings and traffic in later, once they have had time to respond.
If this is one of many sites you onboard, standardise the whole thing:
- The connector handshake.
- The filter order.
- The week-one quick wins.
- The report template.
A repeatable onboarding is what lets an agency take on the next client without the wheels coming off. Our white-label SEO guide covers presenting all of this under your own brand, and the features overview shows the full set of generators you can lean on.
Frequently asked questions
Should I ever just ask for the client's admin login?
No. It is bad practice for both sides. An Application Password gives a scoped, revocable credential without the client handing over their real password, and they can cut your access the moment the engagement ends. AutoBoost connects through the connector plugin plus an Application Password, which is the clean way to do it. Asking for the admin login signals to a sophisticated client that you do not work tidily.
How fast can I actually show a result?
Often within the first week. Missing metadata on pages that already get traffic is the fastest win available on most WordPress sites. You scan, filter to the gaps, generate, review and approve the batch, usually in an hour or two of hands-on time. The slow, strategic work runs in parallel behind it.
Does AutoBoost replace the client's existing SEO plugin?
No. It works with RankMath, Yoast and AIOSEO, reading their existing data and writing optimised values back into them. The client keeps the SEO plugin they already use, so nothing about their setup changes structurally and there is no risky migration during onboarding.
What if the client is nervous about automation touching their site?
That nervousness is healthy, and the human-in-the-loop design answers it directly. Nothing publishes automatically. You review every generated value against a quality checklist and approve or reject before anything is written to the live site. Show the client the approval screen during onboarding so they can see you control exactly what goes out.
Which AutoBoost plan suits an agency onboarding several clients?
The Agency tier covers 30,000 posts, which comfortably handles a roster of typical small-business and blog clients. The Enterprise tier adds white-label so you can present the whole workflow under your own brand. Match the plan to the combined post count across the sites you manage rather than to the number of clients.
The takeaway
A strong onboarding is not about doing everything in two weeks. It comes down to three things:
- Getting access cleanly.
- Capturing a baseline you can defend.
- Shipping one visible, real improvement fast so the client trusts you with the slow work.
WordPress hands you that quick win in the form of fixable metadata, and AutoBoost lets you scan, generate and approve it without burning the hours you need for strategy.
Next steps:
- Get the features walkthrough.
- Check the Agency and Enterprise pricing.
- Pair this with managing SEO across multiple WordPress sites to turn onboarding into a repeatable part of your service.